
Some basic principles should be followed to obtain images in a format that allows for proper evaluation of a skin condition. Before taking pictures, it is important to:
- Be sure to obtain documented informed consent before image acquisition. If the images are intended for web-based publication or use (or could be used by someone else for this purpose), ensure a proper discussion of the ramifications and implications of this.
- Ensure adequate preservation of patient privacy in the acquisition, storage, and use of any image.
There are a variety of devices that can be used for dermatological imaging; These devices include smartphone / tablet accessories, point-and-shoot cameras, and cameras with an interchangeable lens system. For more information on the devices to use, read Digital Cameras for Dermatological Imaging.
Type of images to take
For accurate documentation of a skin condition, it is important to take at least three types of images:
- Contextual images
- Macro images
- Micro images
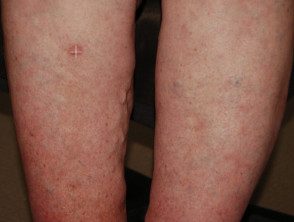
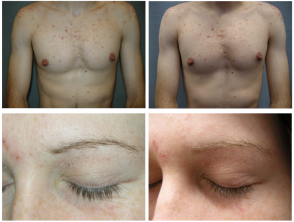
Contextual images in dermatology are images where the image of a injury or skin disease o 'eruption'Captured in relation to a specific site or region of the body that gives some indication of anatomical location and / or size and / or shape. It can also convey information about impaired function (eg, Fixed flexion deformity of linear morpho) and / or disfigurement. Contextual images give a "general" view or appearance of an injury or dermatosis in relation to the body region.
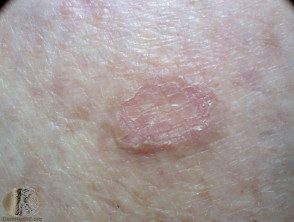
Macro images (photomacrography or macro photography) are close-up images of a subject. In dermatology, it generally refers to close-up images of an injury or dermatosis. Normally, the anatomical context is largely lost because the image focuses on the lesion or dermatosis, excluding the surrounding anatomical structures. Macro images of a subject usually have a scale 1: 1 (life size) or 1: 2 (1/2 life size) reproduction ratio when used with standard 35mm film or digital image sensors. If smaller sensors are used in digital cameras, smaller proportions can be used to obtain the life-size capture of an injury or dermatosis.
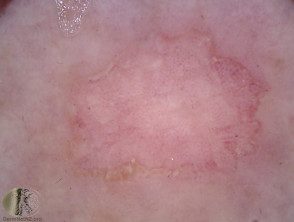
Microimages (or photomicrography) generally refer to the image of a subject (lesions or skin disease in dermatology) with a reproduction scale greater than 1: 1. With increasing magnification of a subject, all anatomic landmarks are lost with this degree of magnification. Most often in dermatology, dermoscopic images capture a lesion that has already had approximately 10-15x magnification. Microimages in dermatology also encompass capturing images directly from a microscope at a magnification of x 5, x 10, x 20, x 40, and x 100. In dermatology, the final scale reproduction ratio of microimages is often much higher than 1: 1 scale reproduction due to the size of the sensor used (the size of the sensor used is usually less than the standard of 35 mm for the size of the film / digital image sensor) and the optical magnification of the device (dermatoscope or objective lens of the microscope). Even more extreme magnifications can be used to image small parasites such as Mites, fleas, lice and other subjects with portable USB digital microscopes.
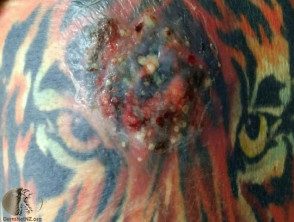
Porokeratosis images
Contextual
Macro
Micro / dermoscopic
Steps during image acquisition
- Use the lowest possible film speed (ISO).
- Use the highest quality JPEG settings (that is, with the lowest compression of image information) possible to retain details. Alternatively if you want the latest control On image quality, you can shoot in RAW mode if available on your device. (RAW is a file format that contains all the data recorded by the camera's sensor when an image is taken; by comparison, when shooting in a format such as JPEG, the image information is compressed and lost. Please note Please note, however, that the sizes of the RAW files are very large and require further processing of the images after capture, usually on a computer or tablet.)
- Ensure adequate lighting of the subject. The better the lighting, the lower the ISO that can be used.
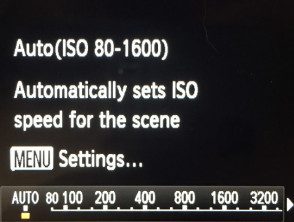
ISO options
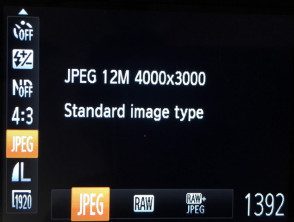
File format
White card reflects light from subject
- Make sure the imaging device has a suitable white balance setting to allow faithful color reproduction and / or use an external light source to help adjust the color balance.
- Keep the device stable when taking the picture.
- Highlight or focus on the subject. Keep the funds as simple as possible. Avoid distracting unnecessary colors in the background or objects in the environment. As much as practical, try to fill the frame with the subject. If possible, use the skin as a background.

White balance settings
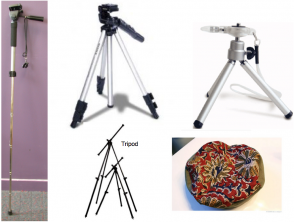
Tools to keep the camera stable
Use a simple background
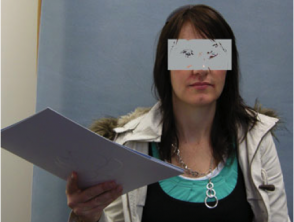
- Try to avoid including distinctive features or anatomical landmarks that can identify the patient in images whenever possible.
- If there is not enough ambient light available in the environment, use a flash. If in doubt, take two copies of each image: one with a flash and one without a flash.
- If you use a flash, try to minimize flash reflections by avoiding shooting at a 90 degree angle to the skin surface. When using a limb flash or body shot, try to avoid shadows by fading the flash (for example, by covering it with a semi-opaque cover) or by bouncing the flash off a shiny surface. If you use a flash very close to the surface of the skin, you can use flash compensation (which has the ability to reduce or change flash output) and / or exposure compensation (which has the ability to reduce or change the degree of exposure of an image) is useful.
Distinctive feature
Images with and without flash

Flash compensation setting
- Ring flashes are great for close-up lighting, even, but they tend to flatten an image by reducing visible contours. A carefully used directional flash can sometimes convey a better impression of depth, contour and shape and give a more pleasing image.
- Avoid using a wide-angle lens or a wide-angle lens setup, as it can introduce significant geometric distortion and / or unrealistic reproduction of features (for example, the nose appears too large on one side).
- Macro photography, using dedicated macro lenses, with interchangeable lens cameras is generally associated with a very narrow depth of field, which means that the accuracy of the focus point and the aperture (the amount of light reaching the image sensor) used is very important to make sure the whole topic is in focus. The use of smaller camera sensors is associated with a much greater depth of field, which means that a larger part of the subject is more likely to be fully focused if the focus is accurate (i.e., increasing depth of field: smartphone / tablet sensor camera> point-and-shoot camera> camera with 1-inch sensor> micro 4/3 camera> Advanced Type-C photographic system [APS-C] camera with size sensor> 35-size full-frame camera mm).
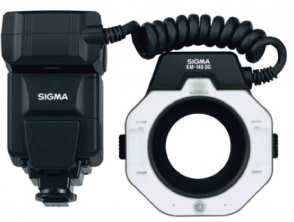
Flash ring

Image distortion
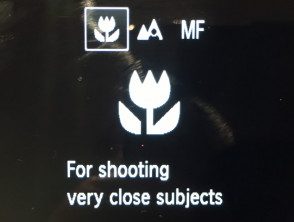
Macro adjustment
- Dedicated macro lenses can capture images in 1: 1 (life-size reproduction) or 1: 2 (1/2 life-size) reproduction ratios, more than enough for dermatological requirements. Short macro lenses (35mm and 50–60mm equivalent lenses) are small but have short minimum focus distances from the front lens to the subject, which can cause lighting problems or distract the subject (eg, Children). 35mm equivalent to 100mm macro lenses for use with DSLRs have fewer problems with lens illumination and shading due to longer working distances, but are larger in size. Even lower reproduction ratios may suffice if the images are cropped.
- When cropping (using only a selection or part of a larger image), a high resolution image may still provide sufficient image quality for your use, but this depends on the image device used and the intended application of the image (for For example, web-based viewing requires much lower resolution and image quality overall compared to images on a printed poster.)